Audiobook CDs are plentiful and a good way for the audiobook addict to get their fix. This is a tutorial on using fre:ac to "rip" audiobook CDs.
In the world of the Audiobook Addict, we have a very different meaning for the term.
From Wikipedia: "Ripping is the process of copying audio or video content to a hard disk, typically from removable media. The word is used to refer to all forms of media. Despite the name, neither the media nor the data in it is damaged after extraction."
That's good to know! I would not relish the idea of opening my CD-ROM drive to find silvery slivers. It is also good news for the audiobook addict because there are many excellent sources of audiobooks on CD. The obvious ones are the big players in the book selling business like Borders and Barnes and Noble, and for online sales, Amazon (this link will take you to Amazon's best sellers). Personally, I like Half Price Books. If you are lucky enough to have one near you, you can buy new and used books at excellent prices, and sell your old ones. They have a pretty good selection of books on CD at the store near me, so I went down and purchased one for the tutorial.
(this link will take you to Amazon's best sellers). Personally, I like Half Price Books. If you are lucky enough to have one near you, you can buy new and used books at excellent prices, and sell your old ones. They have a pretty good selection of books on CD at the store near me, so I went down and purchased one for the tutorial.
I know that most of the media manager programs like iTunes and Windows Media Player can rip audio CDs, but they are geared toward ripping music and cataloging it into a collection. They can be difficult to setup properly and tend to make transferring the converted files to the player tricky. This is the reason I've been recommending the oddly named fre:ac software for ripping audiobooks. Once the book is properly ripped, you can transfer the files to your player by any method you choose.
fre:ac
From the site: http://www.freac.org/
"fre:ac is a free audio converter and CD ripper which integrates various popular formats and encoders. It currently supports MP3, MP4/M4A, Ogg Vorbis, FLAC, AAC and Bonk files."
Downloading and installing fre:ac is a fairly simple and straightforward process. On the right side of the main page, you will see a Download Now button that takes you to a cnet download page where you can download the latest version of the software. I am sending you there instead of linking to the download directly because below that download button, you will see some donation buttons. You may want to go back and donate something to the people who volunteer their time and skill to create good free software. Unlike some other "free" software, fre:ac will not install any toolbars, spyware or other annoyances on your computer.
Now that we have fre:ac installed and running, we can make a few changes to the settings so we get the ripping good rips that we want.
You can go to the Options menu and select General Settings, or just click on the button with the crossed wrench and screwdriver. The general settings window looks like this:
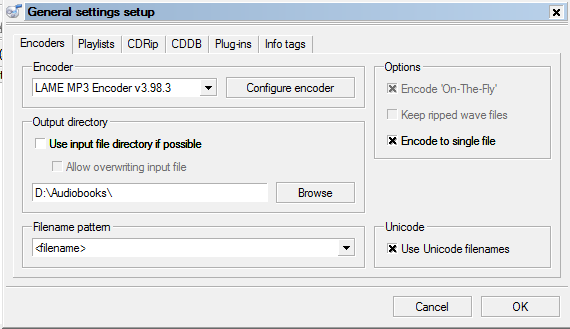
As you can see, I've left the Encoder set to LAME (despite the name it is a good MP3 encoder). We are going to stick with MP3 because it is supported by virtually all portable media players, and lots of other devices too, like the CD players in many cars.
I have set the Output directory to the folder I've created to store my Audiobooks. This folder is not scanned by iTunes or Windows Media Player and that's the way I want it. I find it annoying to have those manager programs mix my audiobooks in with my music collection, and it is fairly easy to keep audiobooks organized by folder.
I have also used the pull down menu to select <filename> as the placeholder for Filename pattern. This means I can simply name the files as I wish. The other patterns work great for music CDs because it allows the tracks to be automatically named from the music databases on the Internet, but audiobook CDs are often not found in those databases and the naming scheme we are using is much simpler.
Finally, I've checked the box in Options "Encode to single file". Audiobook CDs often contain dozens of tracks, and to keep this process simple we are only going to create one MP3 file, or "track" for each CD in the book. Many portable media players, especially the more well known brands offer manual bookmarking, auto-resume or best of all, per track auto-resume (a form of automatic bookmarking). So keeping our place in a file over an hour long really isn't a problem. Older CD players would simply start at track one when you had turned them off and restarted them later so the publishers would put many tracks on the disk so you could note the track you were on to resume listening later.
Now let's click on the Configure Encoder button and change the way the MP3 files are created:
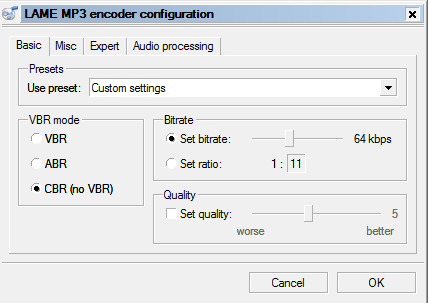
Since most of these applications are generally used for ripping Music CDs, the default settings are usually overkill for the task of converting recorded speech into compressed files. We can set our ripping program to use much higher compression (fewer bits per second of audio) and still get very good sounding audiobooks. This is a good thing because audiobooks can be many hours long and would quickly fill our disk drives and players.
First, we need to change Presets to "Custom Settings".
Set the VBR mode to "CBR (no VBR)" this will eliminate any potential issues with seeking (FF and RW) on the player.
I recommend setting Bitrate to 64 kbps. This will give good sound quality and very reasonably sized files.
Now click on the Misc tab:
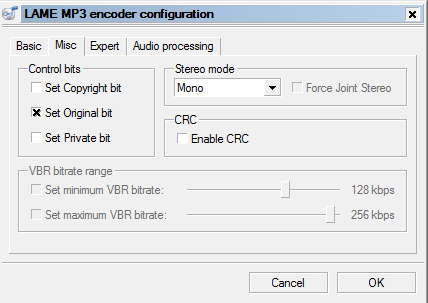
Change Stereo mode to "Mono". This can help improve the quality of the sound in some cases and helps if you like to listen in one ear, since some books with multiple readers "pan" the voices toward the left or right for effect. If you want to retain the left/right separation on this type of audiobook, use the Joint Stereo setting.
We will leave Expert and Audio processing alone for now. (if you are an "expert" feel free to mess around with that tab) 
Now click OK to close the Encoder settings and OK again to close the General settings.
I know that was a pain, but for most of us, it's a one time deal.
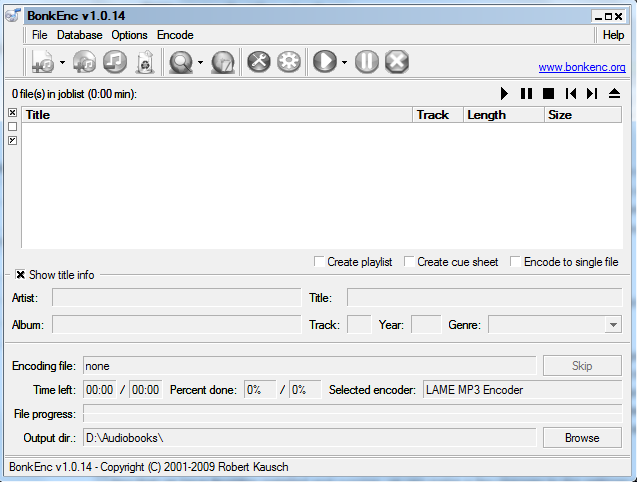
So now we are back at the main window, are you ready to rip?
Great, we will insert the first disk of our Audiobook and see what happens. I selected "Whiskey Sour", (a jack daniels mystrey) by J. A. Konrath. I'm guessing it's a somewhat humorous detective novel, hopefully something in a Tim Dorsey vein. I'll let you all know how it goes after I give it a listen. So once I've inserted the disk, fre:ac checks the CDDB database and woah! it actually found all the information about the book! I am pleasantly surprised to see this:
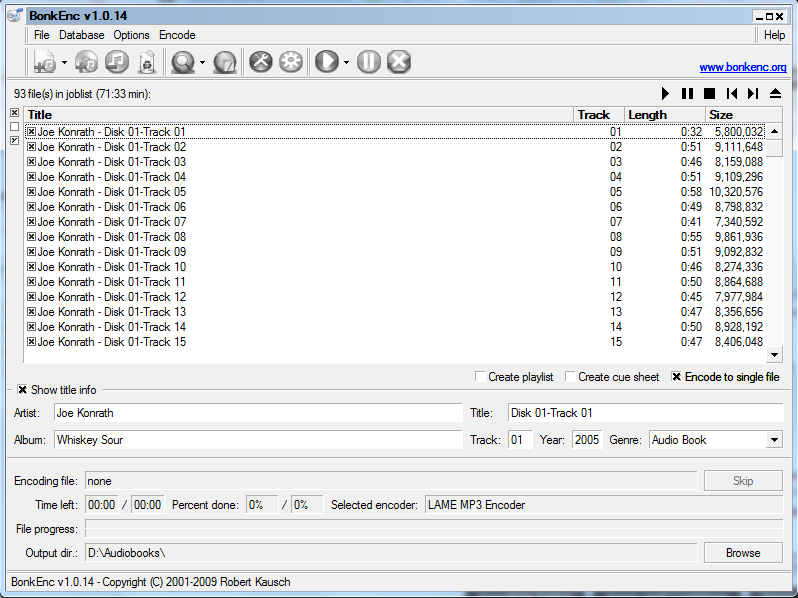
Great! Thanks to whoever entered that data into the CDDB database! Just make sure the Artist and Album name remain consistent. In my example book, I noticed that the third disk had "Whiskey Sour Disk 3" as the album title. Easy to fix by just deleting the Disk 3 from the title. Had I missed that, I might have seen two or more "Books" in my player.
Now, if there was no information in the database for this book and I had only seen Track 01, Track 02, and so on, it would not have been a big concern. All I need to do at that point is to enter the Artist, Album and Genre information into the blocks provided. For Genre, use Audiobook or Audio Book, Sansa Players and some other players will recognize either and show these files in the Audiobook section. As you enter this information, notice that a small down arrow appears at the top right of each box, for Album, Artist and Genre, use this menu to change the setting to "Use for all selected tracks"
Once you have your tags in place, press the "Play" button in the toolbar or select "Start Encoding" from the Encode menu and off you go! You will get a file Save As window like this:

Name each file: Notice that I created a folder for the book and simplified the name of the file to "01 - Whiskey Sour.mp3" Leading zeros can help some players sort the tracks properly.
So I click Save and let fre:ac do it's thing. Depending on the speed of your computer and drive, you may have time for a tasty beverage or a four course meal.
Now like it says on the back of the shampoo, "Lather, Rinse, Repeat" until you are out of disks. Don't forget to name each file sequentially. You will be able to see the existing disks in the folder each time you start the ripping process. In our example the second disk would get named "02 - Whiskey Sour.mp3" and the third, "03 - Whiskey Sour.mp3" and so on...
Now that you have your book as a collection of MP3 files, you can copy them to your player. How you do that depends on the player. Many players show up in the My Computer window and you can open it just like a drive to drag and drop your files into the appropriate folder. There are so many different player and media manager combinations, I really can't cover them all here, so leave me a comment below if you have any questions and I will answer them as best as I can.
Issues
As you can see, fre:ac is well suited to this task. If you find any issues, please let me know so I can address them. One thing I have noticed is that when we encode all tracks as one, the program leaves the Track info blank in the final file. I assume that most players would fall back to sorting the tracks by file name, but if your player has problems, it is a simple matter to edit the Track info in the Properties using Windows right click option, or use a program like MP3Tag to fix up the information that is embedded in the files. (called ID3 tags) Most modern players use this information to be able to sort and present the files in may different ways.
Title: When we have Encode to single file checked, fre:ac copies the Album info into Title, so some players that show title will show the same title for all disks. Use one of the two methods above to change the title information if this is a problem on your player.
Thanks for reading!
Hi Chris,
ReplyDeleteThanks for the info. Nicely done. I do wish you had used a problem audiobook for your example. My experience with the CDDB database is that it rarely finds the book I'm ripping, or worse, finds the wrong book. I've also found things like all the tracks on disk 7 being titled eg. "disk 3 track 1".
I mostly listen to audiobooks while going to sleep at night, so I'm no longer there to press pause, and wake up with the mp3 player at the end of the last track of the disk. It's easy to poke through 15 or 25 tracks on my Sansa mp3 player to find where to resume the next night. It's not so quick or easy when all the tracks are merged into one big file.
So I rip tracks to separate mp3 files. The problem I have here is that the missing (or incorrect) data: artist, album title (=disk), date, and genre must be entered for every single track. I'm looking for an alternative to Windows media player. I find the jumbling of music and audiobooks, the whole "library" functionality, undesirable. But at least with WMP, one needs to manually edit artist-album-date-genre data only once for each CD and it is applied to all the tracks. After the first CD of a book, autocomplete brings up the author and album name and genre after typing just the first letter or two. It would be nice if fre:ac would do the same. Even better would be a batch rename tracks (="titles") function, eg: a mask such as "Deluge 05 track ##" would sequentially name all tracks "Deluge 05 track 01" to "... track 18."
Thanks,
Pat
Since my last message, I found (almost) exactly what I was looking for. Media Monkey (free version) is very nice for ripping, and much else. In particular, it allows editing of data for all tracks on a CD at once. It also provides an editable mask to define the save path folders and file names. I'm happy. My Sansa mp3 player is happy. Cheers.
ReplyDeleteI'm trying out MediaMonkey but it doesn't appear to have any special features for ripping audio books (multiple CDs) in sequence. In particular, it would be nice if it behaved like the old DOS-style file backup / restore software, where it would prompt for Disc # X, rip its contents, then ask for Disc # X+1, etc., placing the resulting hundreds of files into a common folder with appropriate Track Numbers.
DeleteMy solution using Freac was based on not needing hundreds of files using modern players with bookmarking and resume features. The original reasoning for the many files on CD audiobooks was to accommodate basic CD players that had no resume. One could note the track when they wanted to stop and skip to that track when they wanted to resume listening.
DeleteI'm not sure I see a need for that sort of complexity anymore, so I outlined my one track per CD method.
Doing what you describe with Freac would not be that difficult save for the lack of auto prompting. You would just prefix your track names with "D01", "D02" corresponding to each disk. The resulting hundreds of files could all go in the same folder without conflict.
Chris, This is great information and exactly what I was looking for. Thank you. I'm unable to add the artist, album, title or any other information in that area. Any suggestions? It's just grayed out.
ReplyDeleteFor some reason I'm unable to edit the genre, artist info, title, etc, for a book with an entry in CDDB (White Heat by Jim Butcher). I'm quite frustrated with having to use MP3Tag to have to edit EVERY file to be genre Audiobook... and THEN having to edit again once it's on my iPod. Why can't fre:ac just CALL it an audiobook?
ReplyDeleteWould it help you Ross if you turned off CDDB in General settings?
ReplyDeleteI'm not an iPod expert by any means, so I don't know why it's not picking up the tabs. Audiobook is a non-standard tag, and will only work with v2 tags I believe as the older v1 standard used a number to represent genre. You should make sure ID3 v2 is selected in settings for tagging, and if that's no help, try the Speech genre. I know at least the Sandisk players will recognize that tag as an Audiobook.
Hope that helps!
Chris,
ReplyDeleteI ripped a 3 disc audiobook with fre:ac. I loaded them on my mp3 player, but the player only has the first 2 discs. What would cause that to happen. Thank you. John
Hi John,
ReplyDeleteIt is hard to say. How were you copying these files over to the player? Have you tried copying the third disk again?
Hi John,
ReplyDeleteIt is hard to say. How were you copying these files over to the player? Have you tried copying the third disk again?
Hello. This is a very old article, yet it is one of the first ones to come up when I google search for a way to move my audiobook CDs to MP3 format. I hope you still check this account and can possibly still help me out. I've downloaded this software and attempted to use it. I own numerous audiobooks that I'd love to get onto my MP3 player.
ReplyDeleteHere is my issue. I load the CD's as described above. They show up in the file I'm trying to store them on my computer as I've named them. However, after getting to "Disc 5", something gets corrupted. Each time I load a new disc, I listen to each one to hear, "Jane Eyre, Disc 1; Jane Eyre, Disc 2;" etc. But somehow, after Disc 5, suddenly the file that had been correctly playing Disc 2 plays Disc 5 instead, and the file that is Disc 5 also plays Disc 5, and Disc 2 is gone altogether.
This happened with 2 different books - Jane Eyre and Mansfield Park - and on 2 different computers. (My personal laptop is quite old and I thought perhaps I just didn't have a new enough operating system to properly use the software.)
I've sent an email to the software developer, but so far I haven't received an answer. I would be more than willing and even delighted to purchase a software application that would do this conversion for me - but I hesitate to buy software that won't do what I need it to do.
I would love suggestions if you have any - or if you've found a newer or different software, I'd be open to that as well. Thank you.
I really haven't messed with Books on CD for some time. I don't think you'd be having a problem like this due to the age of your operating system. It sounds like either a naming error or playback order issue.
ReplyDeleteYou don't mention what you are playing these files on, is it the computer, or a player of some sort?
I'm having trouble understanding your description of the issue, but it sounds like you could try putting each file in a separate folder to make sure they aren't somehow getting overwritten. If that works, you could review your process to see at what point that might be happening.
Here's a tutorial with different software. You might want to just try step one as this tutorial makes one gigantic file with all the disks.
ReplyDeletehttps://boringsworld.com/2013/10/15/converting-books-on-cd-to-a-single-mp3/
So nice to find this and the effort is greatly appreciated Chris. Simple as can be and I didn't get forced into using iTunes!
ReplyDelete